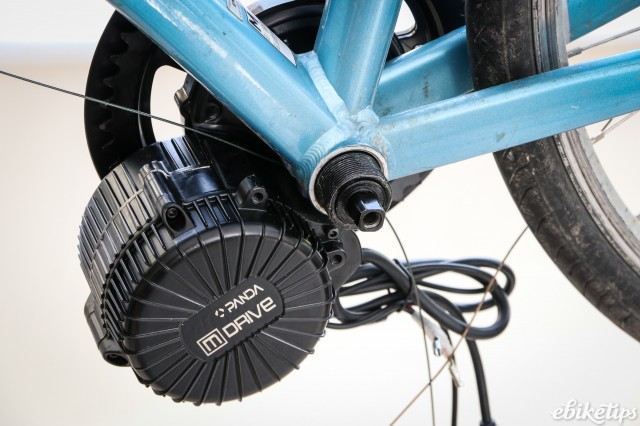
So, how easy it it to convert your bike to an e-bike? Obviously that will depend on what your bike is, and what you’re fitting to it. But for the purposes of research we decided to give it a go, with a fairly standard hybrid bike and a popular conversion kit, the Panda M Drive 250W mid motor kit (£350) coupled with a 470Wh battery (also £350). So, £700 the lot. If you don’t need the range of the bigger batteries (Panda do them up to 720Wh) then you can fit a 320Wh battery which brings the cost of the conversion kit down to £549 all in. That’s less than most e-bikes, and a lot less than mid motor ones.
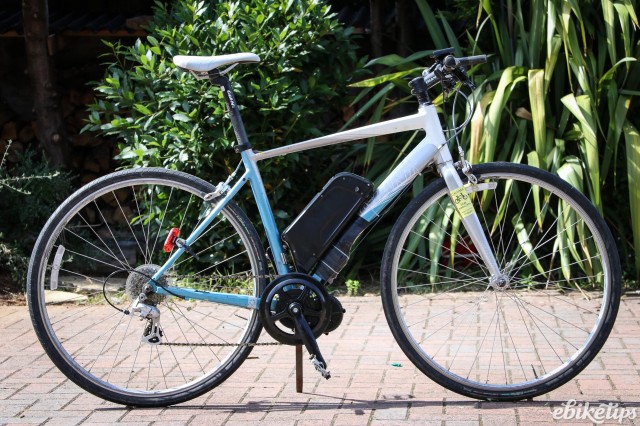
This is our project bike: it’s a Giant Dash women’s hybrid, and it’s about 8 years old. Really the only stipulation with the Panda M Drive kit is that the bike has a standard threaded bottom bracket and the frame isn’t an odd shape down there: if it is, there’s a chance the motor won’t fit. Our Giant had a cable guide under the bottom bracket that was a bit too proud of the frame, and fouled the motor, so we had to swap it for a shallower one.
The kit comes with everything you need: the motor itself, the fixings for it, all the wiring looms, some motor cut-off levers, a throttle, and an LCD display with a handlebar remote.
It also comes with a toolkit which contains the tools you’ll need to fit the motor. The quality of the tools is okay; since I have a shed full of tools I made use of the better quality ones I've already got, but the Panda kit would get the job done.
The first job is to remove the pedals, cranks, and bottom bracket, because the motor replaces them. Most likely any base bike you use will have square taper cranks like ours, in which case you need a crank extractor to loosen them from the taper. Take the pedals off first (it’s a real pain to get them off a loose crank!) and remember that the non drive side pedal has a reverse thread, so it’s clockwise to undo.
Once you’ve got rid of the cranks you can also dispense with the front derailleur, if you have one on your bike, because the Panda M Drive has a single chainring. If you undo the little bolt at the back of the derailleur you’ll be able to slip it off without breaking the chain.
The bottom bracket can be stiff to remove as they’re normally fitted quite tightly. The threads are opposite to the pedals: the non drive side is normal and the drive side is reversed. Normally the non drive side is a short sleeve and that’s easier to remove, so do that first and then attack the main bottom bracket.
Before you fit the Panda motor you have to attach the chainring to it. That’s five bolts, and then there’s a chainguard that fixes with five screws through the chainring.
Hooray! It’s time to start fitting stuff. The motor slides into the bottom bracket…
… and then it’s fixed with a mounting plate that’s held in place with a lockring and a lockring cover. Careful when tightening up the lockring: it needs to be tight, but lockring tools have a tendency to slip off, so avoid skinning your knuckles if you can!
Next thing to fit is the speed sensor, that sits on the chainstay, and the magnet for it that attaches to a spoke in the rear wheel. Make sure they’re nice and close but don’t touch when the wheel goes round.
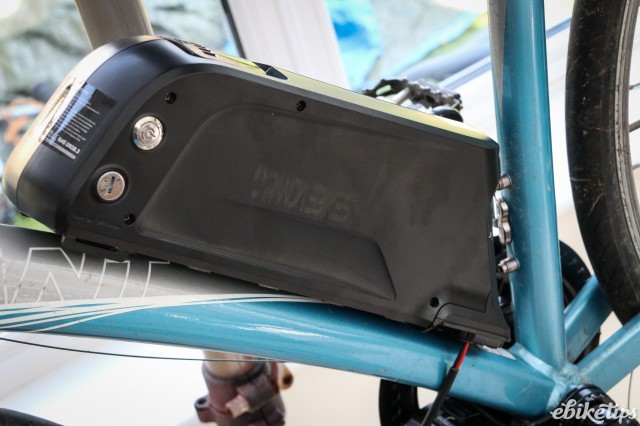
The battery goes on next: there’s a fixing plate that attaches to the down tube bottle bosses. The battery locates into that, and you can lock it in place using the key supplied. Then with those bits in place it’s time to see if the system is live. I plugged all the bits in (without attaching them to the bike) and powered up…
It lives! The LCD works, the remote is changing the assistance level, and when I turn the pedals the motor kicks in. All good. So the rest of the job is basically mounting the bits and tidying up.
Water is not a friend of electric bikes, so it’s worth giving the connections a wrap of insulating tape to keep the rain out.
The connection from the battery to the main system is a particular concern here: it’s not a waterproof plug, just a pair of connectors on bare wire. I gave these a decent dose of tape once I was sure everything was working.
Fitting the LCD display was a bit of a pain: it came with one set of shims, that were much too thick for my bars, but without them the mount was loose. I ended up cutting a section out of them and using that; wrapping the bars in tape or old inner tube would work too.
I decided against using the cut-off levers. Partly that’s because I don’t really see the point of them – most mid motor e-bikes don’t have them – and partly it was because the Giant has integrated shift and brake levers, so I would have needed to find a separate shifter to replace the rear brake/shifter. I didn’t fit the throttle either, just the remote which nestles okay under the (now redundant) front shifter.
The only issue with not fitting the extra bits is that you’re left with a bunch of open connectors. They can be tucked out of the way under the down tube, but they’ll need to be waterproofed. I might just stick a cut-down balloon over them to keep the water out.
One problem you’ll always have to tackle with a conversion kit like this is that the cables will almost certainly be too long: they need to be long enough to cope with all the different bikes they could be fitted to, and a women’s hybrid certainly isn’t the biggest bike I can think of. The speed sensor cable I gathered and zip-tied under the motor, which is fairly neat, but I still had a big jumble of wires under the down tube.
In the end I cut an old inner tube lengthways and used that to gather the cables and keep them out of the way. It’ll also double as another layer of waterproofing. Fitting the battery back on meant getting the craft knife out to find the bottle bosses through the layers of rubber, but it wasn’t too difficult and the rubber might knock out a bit of the vibration being passed to the battery too.
So that’s the last job (well, except for re-cabling the rear mech after swapping out that cable guide) and we’re done! All in all it took me just under two hours from hooking the bike on the stand to the first test ride.
Is it difficult? Well, not if you’ve had some experience of bike maintenance, but if you’re starting from scratch you’d probably be better off entrusting the job to your local bike shop, or at least getting a handy friend to help you out. Mostly it’s a case of having the right tools, and knowing which way things unscrew. Fitting the brake levers and throttle, which I passed on, would add time, but probably not that much. Certainly if you’ve got half a day to spare, some bike repairing skills, or the help of someone who has, then you should be able to get up and running. This is a mid motor kit which requires that you remove the bottom bracket; If you were fitting a front hub motor kit the job would be easier, and probably quicker.
First ride impressions
I’ve had a quick run round on the Giant Panda (as I’ve now christened the bike) and first impressions of the system are pretty good. There’s plenty of power there: I’ve been up my reference hill (1.5km at 5% average, 12% max gradient) without breaking a sweat. The power application is a bit different to other systems I’ve tried, with the motor helping you a lot more when you’re pedalling slowly. So the urge to change to lower gears when climbing is best resisted if you want the most help. The motor is quiet, the LCD display is good and the remote easy to use. Nothing rattles, either. So far so good: look out for a full review on ebiketips soon.
